 Alveo Creative Blog Guiding users through techniques for enhancing images, retouching portraits, and mastering popular editing software
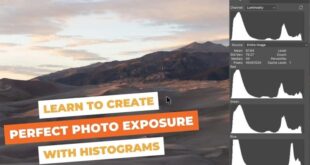
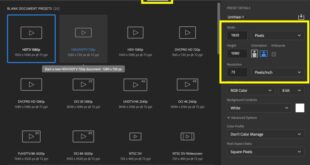
How To Create Visually Appealing Poster Designs Using Typography In Photoshop – Let’s start with our poster project in Photoshop by choosing the right size. Industry standards suggest 24 × 36 inches. These dimensions make printing and display straightforward.
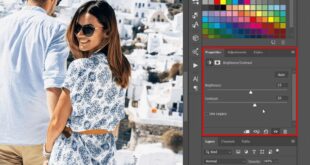
Additionally, using tools like the patch tool in Photoshop can help fix any imperfections in your poster design. To add a creative touch, you can explore the blending modes in Photoshop to improve the visual appeal of your poster.
How To Create Visually Appealing Poster Designs Using Typography In Photoshop
Below is a table that outlines the must-use tools and their best uses, helping you streamline your design process and achieve professional results.
18 Creative Research Poster Templates (word, Powerpoint) ᐅ
If you want to optimize your images for social media after creating your poster, consider checking out the Lightroom export settings for Instagram and other social platforms.
Think about how you arrange left and right letters. Generally, place the main letter in the center or slightly off-center, with the secondary letters on the sides.
To make the characters stand out, use Selective Focus in Photoshop to draw attention to the main character and keep the background elements less prominent.
Additionally, using dodge and burn techniques in Photoshop can help enhance highlights and shadows, giving your characters more depth and dimension.
Top Tips & Essential Elements For Graphic Design Posters
Background images add visual appeal. Use city maps, urban landscapes or abstract designs to fit the movie theme. Seamlessly merge photos for a cohesive look.
Pro Tip: Seamlessly blend photos for a cohesive look with Content-Aware Scale in Photoshop, which lets you resize and manipulate images without distorting key elements.
Create a captivating poster in Photoshop by using adjustment layers to modify your color history. Adding a spooky preset or teal-orange tone brings mood and style.
Pro tip: Always save your work in different stages. If something goes wrong, you can recover without losing everything.
Text Tool In Photoshop: Typography Mastery
Setting your canvas size correctly and using the right tools will make your job easier. For example, the Object Selection tool in Photoshop can help you isolate and manipulate elements with precision.
OK, let’s choose the right background for your poster. It sets the scene and the mood. Think about the genre of the movie (horror, drama or action). Everyone has their own look.
For a spooky poster, choose a dark forest or an abandoned building. The backgrounds create an eerie atmosphere.
Import your selected image into Photoshop. Cover the entire canvas with this. Use the Free Transform Tool (Ctrl + T) to adjust the size. Make sure it fits perfectly.
How To Make A Simple Frosted Glass Effect In Photoshop — Medialoot
Pro tip: To enhance the mood, you can use gradient techniques in Photoshop to add subtle lighting effects.
Pro tip: Always start with the background. A strong foundation simplifies your workflow. Trust me, your schedule will thank you!
Mastering focus stacking with Photoshop is a must to create detailed images. This technique, along with filters and adjustments for movie posters, ensures that your visuals are captivating and professional.
Okay, time to bring in the main character. Your background sounds good; Now, let’s add the stars.
Designing A Poster For An Event
Too big or too small? Use the Free Transform Tool (Ctrl + T) to change the size. Make sure the character is different.
Pro Tip: Try Smart Filters in Photoshop to apply non-destructive adjustments, improving the look of your character without losing original quality.
Place the letter for maximum effect. Center or just off center usually works best. It helps the audience focus. Place the character layer on top of the background layers.
Create a layer below the letter for the shadow. Use a stiff round brush with low opacity. Draw a shadow following the direction of the light in your background. It adds realism.
Poster Templates In Apple Pages, Imac
Now, blend the letters with the background. Start with a Hue/Saturation adjustment layer. It matches the font and background colors.
Experiment with blending mode options like overlay and soft light. They help the character fit into the scene. If necessary, reduce the opacity of the character layer a little.
Do not ignore the edges. Use the blur tool to gently blur the edges of the background or text. A gentle touch creates a natural transition.
Adding lighting effects is a must. Create a new layer above the letter. Use a soft white brush to paint the light sources, and lower the opacity.
Making A Poster Design In Photoshop
Use Free Transform (Ctrl + T) to distort it until it looks like a shadow. Adjust opacity for realism.
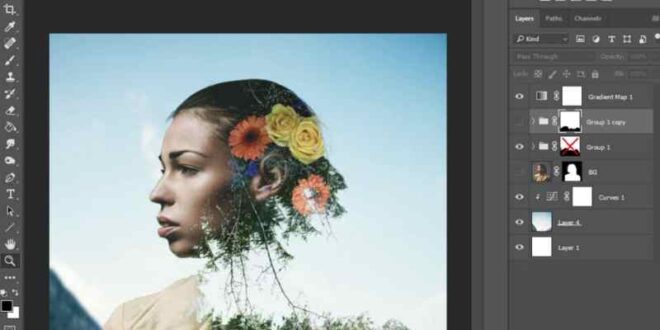
Use masking techniques to hide parts of a layer without erasing them. For example, if your character is standing in front of a dramatic sky, use a mask to soften the overlap. It adds depth to your design.
Test, adjust and try again. Your eyes are the best judge. If it sounds right, it probably is. The goal is to make your character and background work together.
Pro tip: Consider using Playsit’s poster maker templates. These templates offer pre-designed layouts that can speed up your process.
70+ Best Photoshop Text Effects 2025 (free & Premium)
Choose a title font that is clear and readable from a distance. Avoid too modern fonts. Make sure the audience can read your headline straight away.
Match your fonts to the vibe of your movie. Don’t use whimsical fonts for serious drama. The goal is to make it fit.
Your poster needs a title. It’s the first thing people see. Use the text tool (accessed by the T on your keyboard or the text box). Click where you want the title. Type it in your chosen font.
Font placement is important. Place the title at the top or center for maximum impact. People read from top to bottom, so the top is a natural place.
Sports Poster Design Tutorial
Use the Free Transform tool (Ctrl + T) to change the size and position. This is your canvas; Make it look right.
In addition to the title, add other text such as taglines, actor names or release dates. It combines excitement and information.
For taglines, small fonts work best. They should not overshadow the title but still be read. Use the Text Tool (H) to connect them. Short, attractive lines work well.
Put the names of the actors next to or below the title. Use a larger font than the taglines but smaller than the title.
20 Minimalist Movie Poster Examples And Templates To Make Your Own
Match the color and style of your text to your background. Use light-colored text for contrast on a dark background. This is especially useful when working with portrait text effects.
Remember the font hierarchy. Make your most important text (heading) the most prominent. Taglines and other details follow. It guides the viewer’s eye naturally.
Learning how to remove backgrounds in Photoshop is a valuable skill for any designer. This technique is especially useful when adding extra text to your designs, allowing for a cleaner and more professional layout.
Okay, we’re almost done. You’ve worked hard on your movie poster, and now it’s time to add the finishing touches that make it shine.
Typography Tools For Art Direction: How To Choose Fonts And Create Typography That Pops
Pro Tip: Use the Warp Text feature in Photoshop to create dynamic and visually appealing text effects that enhance the overall design of your poster.
Pro tip: Consider removing unnecessary shadows to ensure your text and other elements stand out clearly against the background.
Creating a movie poster in Adobe can be a fun and rewarding project. I shared my experience on how to choose backgrounds, arrange characters and make everything blend seamlessly. Using tools like the brush tool, magic wand tool and adjustment layers helped me create detailed and professional posters.
If you want to learn more and improve your skills, check out my Photoshop course and Lightroom course. They offer step-by-step guidance and tips to take your design to the next level.
99 Important Design Words You Should Know
Discover the secrets of photography with our printable guide! Master basic techniques like aperture, shutter speed and ISO to create stunning images. Get your free printable PDF now and start turning your snapshots into masterpieces! If you haven’t discovered the images in text poster design yet, get excited because you’re doing amazing things with visual design!
We’ll show you how to take just one poster template and turn it into 10 amazing poster designs in just a few clicks – using our unique image in text poster style.
Let’s jump in because you need to see them directly. Here’s a preview of how the image looks in our text poster design, all created with Easil’s text mask tool:
Let’s do it! The “Hack Your Visual Design” series (here’s a previous post) is all about showing you how to take a single DIY design template and turn it into 10 different designs. It’s easy with Easy!
Graphic Design: Insights Into Creating Movie Posters
We used our text mask tool to transform 10 posters to make them stand out and stand out. Why are we so excited about this tool feature? Because in the past, creating images in text design was limited to using tools like Photoshop. Which has become difficult for anyone but designers to use. Until now!
We’ll start with a base template, and move on to all the amazing poster designs you can create with it. We’ve also included some hot tips at the end of this post to help you use your template.
We use the ‘We Love Live Music’ template below in this example. Comment how it looks before we make any changes. We used two simple fonts, some line graphics and a background image.
Notice that the main font is a bigger, bolder font suitable for our use of the Text Mask tool? You’ll see this trend continue throughout this post as we highlight an eye-catching image in the text poster effect!
The 5 Best Free Design Tools To Create Social Media Graphics In 2024
With this Mother’s Day example we took a few easy steps to create a great image in text poster:
Hot tip: If you