 Alveo Creative Blog Guiding users through techniques for enhancing images, retouching portraits, and mastering popular editing software
Step By Step Guide For Adding Textures To Fonts In Photoshop Creatively – Whether you’re designing a poster, creating a social media graphic, or just exercising your creativity, adding texture to your text can bring a whole new dimension to your work.
In this guide, I’ll take you through simple steps on how to add texture to your text in Photoshop, making it eye-catching and memorable.
Step By Step Guide For Adding Textures To Fonts In Photoshop Creatively
Stay tuned, because by the end of this article, you’ll be able to enhance your projects with textures that pop!
How To Add Texture In Photoshop
When working with text in Photoshop, you must first set up your text layer. This is significant for the rest of the process.
Once your document is ready, grab the text tool. Click anywhere in the document to create a text box.
To give your text some flair, you should learn how to add texture to text in Photoshop.
Start by selecting your preferred design image. Go to File > Embedded Place and navigate to your texture file.
How To Create Text Effects In Photoshop
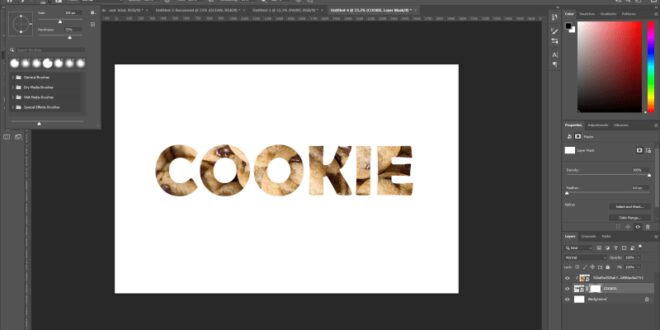
Once your design is selected, place it directly on top of the text layer. Right-click the texture and select Create Clipping Mask.
Blending and refining will make your typography layer even more compelling. It contains subtle tweaks that make a big difference.
Click the Layer Mask icon at the bottom of the Layers panel to add a mask to your design.
Saving comes last. Go to File > Save As and save your file as a Photoshop file for future edits or as a PNG file for shareable format.
How To Create Melting Text Effect In Photoshop
Pro tip: Always make a copy of your original document before making important changes. This allows for easy cancellation if things don’t work out as planned.
In this section, we will guide you on how to choose and combine the perfect design to enhance your designs.
Understanding how to add texture to text in Photoshop is not difficult. The first step involves choosing the right design. You can choose from different textures like watercolor, grunge or cloth.
When you make your choice, make sure it matches the tone and message of your project. Open Adobe Photoshop and create a new document.
How To Add Texture In Illustrator Tutorial
Use Smart Objects for your texture layers. They keep the quality the same when you resize, making your workflow much smoother.
Enter Embedded and select your design image. The texture appears as an extra layer on top of your background layer. Use the free transform tool to adjust the size and position of the design. Press Enter to apply the changes.
Create a clipping mask by placing your textured layer above the typography layer. Right click on the layer and select “Create Clipping Mask”. This constrains the design within the borders of your text. If you want more texture to the text, you can duplicate the Textured layer and adjust its composition.
Refine the texture by adjusting the blending of your texture layer. Soft light and hard light usually work well. You can play around until you achieve the desired effect. Adjust the Opacity slider for a more subtle look.
How To Add Texture In Adobe Photoshop #adobephotoshop #graphicdesign #howtotiktok #designtok
To make parts of your design disappear, add layer masks. Click on the “Add Layer Mask” icon at the bottom of the Layers menu. Use the Brush Tool to paint black on the areas you want to hide. You can use a brush of different sizes and shapes to process the edges.
Save your work. It’s always a good idea to save in PSD format for future edits and as a PNG file if you need a transparent background.
The Layers panel is your control center in Photoshop. Let’s explore how to use this tool to improve your workflow and creativity.
The layers are like sheets of paper stacked on top of each other. Each layer can contain different elements such as images, text or colors.
Inserting An Object Into A Glass Realistically
These layers help you edit parts of your image independently. Think of them as a way to keep your work organized.
Layers allow you to see what’s above and below. The top layer is visible first, but you can change which layers show up by rearranging them in the Layers menu. To move a layer, drag it up or down in the panel.
To create a new layer, click the “New Layer” button at the bottom of the Layers menu. You can delete an existing layer by selecting it and pressing the Delete key.
It’s important to keep your layers organized. Name each layer according to its content. To rename a layer, double-click the layer name and type a new name.
Create A Painted Effect With Artist’s Surface Textures — Nicolesy
Enable the layer’s visibility by clicking the eye icon next to it. Hide it by clicking on the eye again. This helps you focus on one part of your project at once without any distractions.
To undo a mistake, use the undo tool or press “Ctrl+Z”. It’s a quick way to fix errors without affecting your entire image.
Pro tip: Use Smart Objects for texture layers. This keeps the quality intact during resizing and conversion. Happy creating!
Ready to take your text layers to the next level? Let’s dive into two effective ways to enhance your designs in Adobe Photoshop.
Silver And Gold Text In Photoshop Elements
I call this the ‘sandwich trick’, because, like making a sandwich, you have to arrange your ingredients correctly.
If you need to adjust the texture, use the transform tool (Ctrl + T or Cmd + T). You can move it around, resize or rotate it. Once you’re happy, press Enter to apply the changes.
Pro Tip: Need a fresh, clean edge in your text creation? Use a vector mask instead of a raster mask for sharper results.
Consider using the warp text feature to enhance your design even more, create unique effects, and better blend the design with your text layer
The Step-by-step Guide To Digitizing Artwork In Photoshop — Catcoq
Now that we understand the basics, let’s talk about optimizing our design effects. It’s like cooking, you want to get the perfect balance of flavors. In Photoshop, that means tweaking a few settings to make your text look just right.
This mode is your best friend when it comes to making your text pop. You can find it in the Layers menu at the top left. Click on the drop down menu and you will see a list of options. Each mode changes the way your design is combined with the typography layer:
Experimenting with these methods takes some time, but it makes a big difference. Choose one and see how your text transforms. Just like changing spices in a recipe, small adjustments lead to amazing results.
To refine the texture effect, you can adjust the texture layer’s opacity for a more subtle look, allowing for a transparent text effect that blends seamlessly with your background.
How To Use Generative Fill In Adobe Photoshop
Matching layers are like secret ingredients, they add an extra touch of magic. Click on the Adjustment Layer icon at the bottom of the Layers panel.
Pro tip: Don’t forget to use a bounding box when resizing your design. To make sure your design looks crisp and clean, hold Shift to maintain aspect ratio. If you want sharper edges, consider adding a vector mask.
And there you are! Follow these steps and you will master the art of applying textures in Photoshop.
For more advanced techniques, you may want to explore Essential Tools in Photoshop and consider learning Lightroom and Essential Tools in Lightroom to further improve your photo editing skills.
How To Make Your Type Look Distressed And Add Texture Psd Tutorial
To add texture effects to text in Photoshop, start by typing your text and converting it to a shape layer. Then, import the image of your desired design and place it on top of the text layer.
Place a clipping mask on the texture layer and block it within the text. Adjust the texture size, opacity and blending mode to match your texture.
Enhance the effect with Layer Styles and Adjustment Layers as needed. Finally, save your work in the desired format.
In conclusion, learning how to add texture to text in Photoshop has greatly increased the quality of my designs.
Create Realistic Water Droplets With Photoshop
By experimenting with different textures and blending methods, I was able to create visually impactful text that grabbed attention and conveyed the intended message more effectively.
If you are keen to improve your Photoshop skills, I highly recommend checking out my Photoshop course for more detailed tutorials.
Discover the secrets of photography with our printable guide! Master essential techniques like aperture, shutter speed and ISO to create stunning images. Get your free printable PDF now and start turning your snapshots into masterpieces!