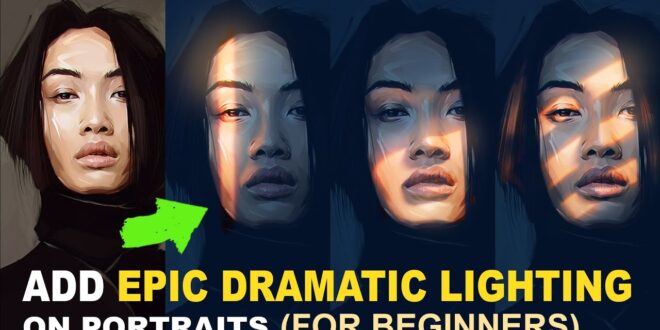
Ever stared at a movie poster , mesmerized by the dramatic lighting on the actor’s face? Ever wished you could recreate that captivating glow , that intense shadow play, in your own artwork? Well , get ready to unlock the secrets! This guide dives deep into techniques for painting portraits in Photoshop with dramatic lighting , helping you master the art of chiaroscuro & adding depth and emotion to your digital portraits. Whether you’re a seasoned pro or just starting out, learning how to manipulate light & shadow in Photoshop opens up a whole new world of creative possibilities. It’s about more than just technical skill; it’s about conveying mood, personality & storytelling through the power of light—giving your portraits a truly unforgettable impact. So, grab your tablet or mouse, & let’s get started!
Mastering Dramatic Lighting in Photoshop Portraits
Meta Description: Transform your portraits into stunning works of art! Learn how to master dramatic lighting in Photoshop, achieving breathtaking results. Elevate your portrait painting skills today!
Hey there, fellow photography and Photoshop enthusiasts! Ever looked at a portrait and thought, “Wow, that lighting is intense“? That’s the magic of dramatic lighting—it adds depth, emotion, and a captivating visual punch to your Photoshop portraits. This guide is your backstage pass to mastering this technique, whether you’re a seasoned digital artist or just starting your Photoshop journey. We’ll transform your photos from snapshots to stunning, almost painterly masterpieces. Let’s dive in!
Understanding the Fundamentals of Dramatic Lighting in Photoshop Portraits
Related Post : How To Create Engaging Social Media Posts Using Photoshop For Businesses
The Importance of Light and Shadow in Portrait Painting
Dramatic lighting, at its core, is all about manipulating light and shadow. Think chiaroscuro—that beautiful interplay of intense light and dark used by masters like Caravaggio. It’s about creating a mood, emphasizing features, and telling a story through the way light falls on your subject. Rembrandt lighting, with its characteristic triangle of light on the cheek, is another classic example of how strategic lighting can transform a portrait. In essence, we’re using light and shadow to sculpt the face and create a three-dimensional effect, just like a traditional sculptor would.
Analyzing Your Source Image: Laying the Foundation for Your Photoshop Portraits
Before you even open Photoshop, take a good look at your source image. Where’s the main light source? Are there harsh shadows? Where are the highlights? Understanding the existing light in your photograph is crucial. This analysis will inform your decisions in Photoshop, helping you enhance, not fight, the natural lighting. I once spent hours trying to “fix” a poorly lit photo, only to realize that a simple crop and a few adjustments to the contrast would have been far more effective. Learning to see the light before you start editing is key!
Essential Photoshop Tools for Dramatic Lighting Effects
Several Photoshop tools will be our best friends in this process. Let’s get familiar with these essentials:
- Curves: For precise control over tonal range and contrast adjustments. This tool gives you the power to fine-tune the light and shadows to your exact specifications.
- Levels: A slightly simpler tool than Curves, but excellent for quick adjustments to contrast and brightness.
- Dodge and Burn Tool: These are your sculpting tools. The Dodge tool lightens areas, while the Burn tool darkens them. Use them subtly and patiently—they’re incredibly powerful, but easily overdone.
- Adjustment Layers: These are non-destructive editing layers, meaning you can always go back and tweak your changes without affecting the original image. This is crucial for experimentation and refinement.
Step-by-Step Guide to Dramatic Lighting in Photoshop Portraits
Preparing Your Image: A Clean Slate for Dramatic Lighting
Start by cleaning up any blemishes or imperfections in your portrait. This includes things like stray hairs, minor skin imperfections, or dust spots. Use the Spot Healing Brush Tool or the Clone Stamp Tool for this. Once that’s done, make any basic adjustments to exposure, white balance, and overall brightness/contrast. This provides a solid foundation before we apply our dramatic lighting techniques.
Creating Depth with Shadows: The Art of Subtlety
This is where the Dodge and Burn tools shine! Carefully darken areas to create deeper shadows, emphasizing the contours of the face and adding dimension. Remember: subtlety is key. Start with low opacity (around 10-20%) and gradually build up the shadows. Focus on the areas naturally shadowed in your photo, rather than creating shadows where they don’t belong. This will prevent the effect from looking artificial.
Highlighting Key Features: Drawing Attention Where it Counts
Using adjustment layers (like Curves or Brightness/Contrast), selectively brighten key features like eyes, cheekbones, and lips. This helps draw the viewer’s eye to those areas. Remember to use layer masks to confine your adjustments to specific regions. Don’t overdo it, but make those features “pop”!
Adding Contrast and Vibrance: Amplifying the Drama
Now, let’s boost the overall drama. Use Curves or Levels to increase contrast, making the highlights brighter and the shadows darker. Experiment with the Color Balance adjustment layer to add a specific mood or tone to your image, further enhancing your portrait painting style.
Refining and Enhancing: The Final Polish
This step involves making subtle adjustments based on what you see. Perhaps a shadow is too harsh in one place, or a highlight needs a little more boost. Continuously refine your work, using layer masks for precise control and making small adjustments.
(Optional: Before & After Comparison Table)
| Step | Before | After |
|————————–|—————————————|—————————————–|
| Original Image | [Insert Before Image] | [Insert Before Image] |
| Basic Adjustments | [Insert Image After Basic Adjustments] | [Insert Image After Basic Adjustments] |
| Shadows | [Insert Image After Shadow Work] | [Insert Image After Shadow Work] |
| Highlights | [Insert Image After Highlight Work] | [Insert Image After Highlight Work] |
| Contrast & Vibrance | [Insert Image After Contrast/Vibrance] | [Insert Image After Contrast/Vibrance] |
| Final Adjustments | [Insert Image Before Final Adjustments]| [Insert Image After Final Adjustments] |
Advanced Techniques for Photoshop Portraits
Using Layer Masks for Precise Control: The Power of Precision
Layer masks are invaluable for precise control. They allow you to selectively apply adjustments, meaning you can darken a specific area without affecting the surrounding regions. Think of them as your digital paintbrushes, allowing you to paint light and shadow onto your image with incredible accuracy.
Creating Dramatic Backlighting: The Halo Effect
Backlighting can add a dramatic rim light to your subject, separating them from the background and creating a captivating halo effect. You can achieve this using a combination of the Dodge tool, adjustment layers, and layer masks. Experiment with different opacity levels to get the perfect glow.
Mimicking Different Painting Styles: From Realism to Impressionism
With dramatic lighting as your base, you can further enhance your Photoshop portraits to mimic various painting styles. Try adding texture using filters, or adjust the color palette to create a specific mood or artistic feeling. The possibilities are endless!
From Photo to Painting: Final Touches
Adding Texture and Grain: A Painterly Feel
Want that painterly look? Add texture and grain to your image using Photoshop filters or textures. This adds depth and a handmade feel, further enhancing the artistic effect you’re aiming for.
Color Grading and Toning: Setting the Mood
Color grading is about adjusting the overall color tone and mood. This might involve desaturating certain colors or applying a specific color filter to achieve a desired artistic effect. Experiment to see what works best for your image and style.
Conclusion: Elevate Your Portrait Photography
Mastering dramatic lighting in your Photoshop portraits opens a world of artistic possibilities. By understanding the principles of light and shadow and using the techniques mentioned above, you can transform ordinary photos into breathtaking works of art. Don’t be afraid to experiment, develop your own unique style, and push creative boundaries! Ready to take your portrait painting skills to the next level? [Link to a relevant course, tutorial, or your portfolio]
FAQ
Q: What Photoshop version is needed for these techniques? These techniques work across most recent versions of Photoshop.
Q: Can I achieve these effects on other editing software? Similar effects are achievable in other photo editing software, but the specific tools and methods might vary.
Q: What are some good resources for learning more about lighting? Online tutorials, photography books, and workshops are excellent resources.
Q: How important is color calibration for achieving accurate results? Accurate color calibration ensures your monitor displays colors consistently, which is very important for precise editing.
Remember, practice makes perfect! Don’t be discouraged if your first attempts aren’t perfect; keep experimenting and refining your skills. The journey of learning and creating is just as rewarding as the final result!
 Alveo Creative Blog Guiding users through techniques for enhancing images, retouching portraits, and mastering popular editing software


